Microsoft Azure SQL Database is a fully managed cloud database service, provided as part of Microsoft Azure.
That means, that via the Microsoft Azure Portal, among other, you can easily create database servers, and thus host your databases. Moreover, you can still continue to use the same SQL tools you used for on-premises SQL Server instances (i.e. SQL Server Management Studio), with the only difference that you will be connecting on the SQL Server instance/database on the cloud.
With this article, I’m starting a series of articles that will help you get more familiar with Azure SQL Database. We start with the basics and then article-by-article we will be discussing more complicated concepts and features.
Learn more about Azure SQL Database: Enroll to our Online Course!
In this article we are going to create our first database in Azure SQL Database step-by-step. However, prior to that, it is worth mentioning that Microsoft, in order to help you get started with Azure and Cloud Computing, let’s you start with a free account on Azure. Learn more about the Azure free account.
OK, that being said, let’s start this interesting article series dedicated on Azure SQL Database.
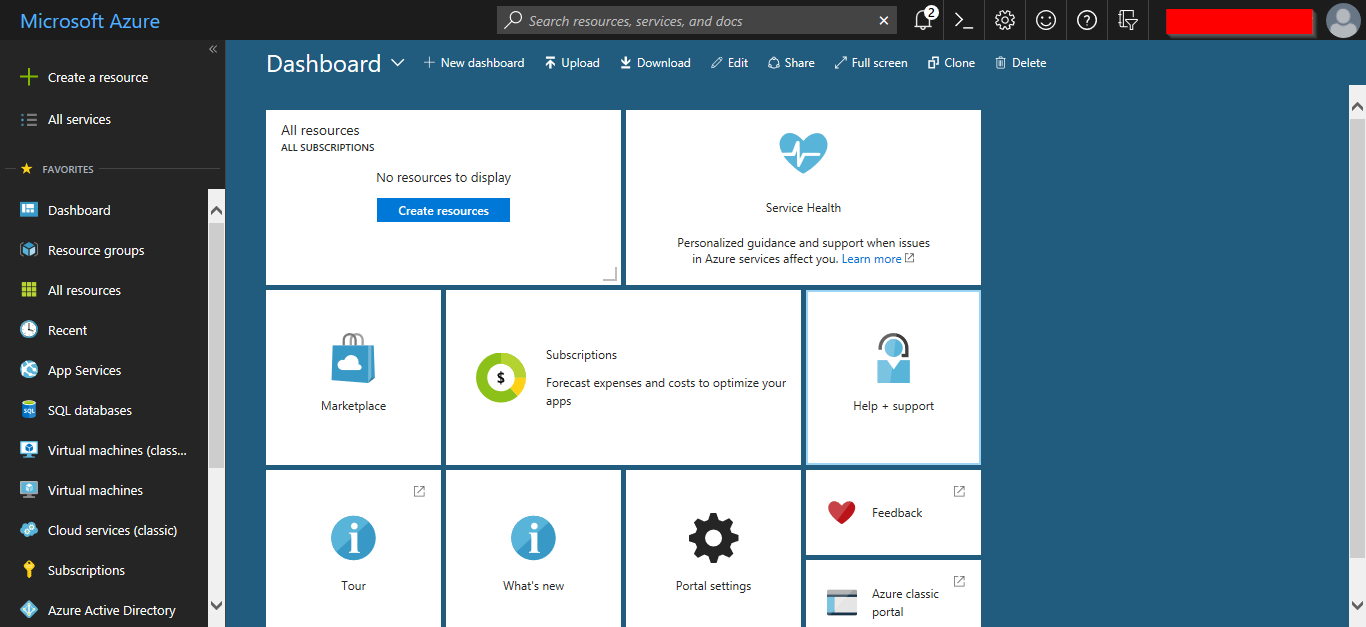
After logging into the Microsoft Azure portal, you are presented with a fully customizable dashboard.
Step 2: In our case, we want to work with Azure SQL Database, so from the left navigation bar we click on “SQL databases“.
There, we can see that there are still not any sql databases to display. To this end, we proceed to Step 3 and therefore we start the process of creating a new SQL database.
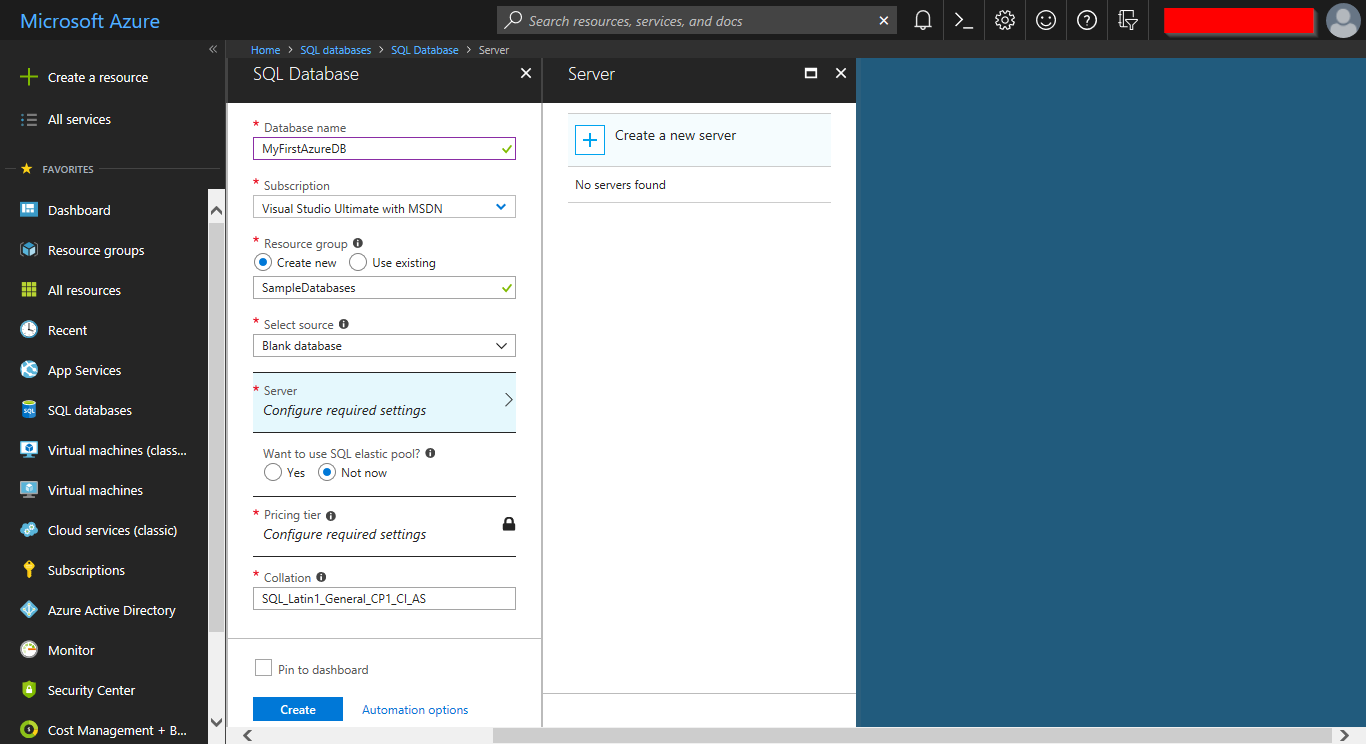
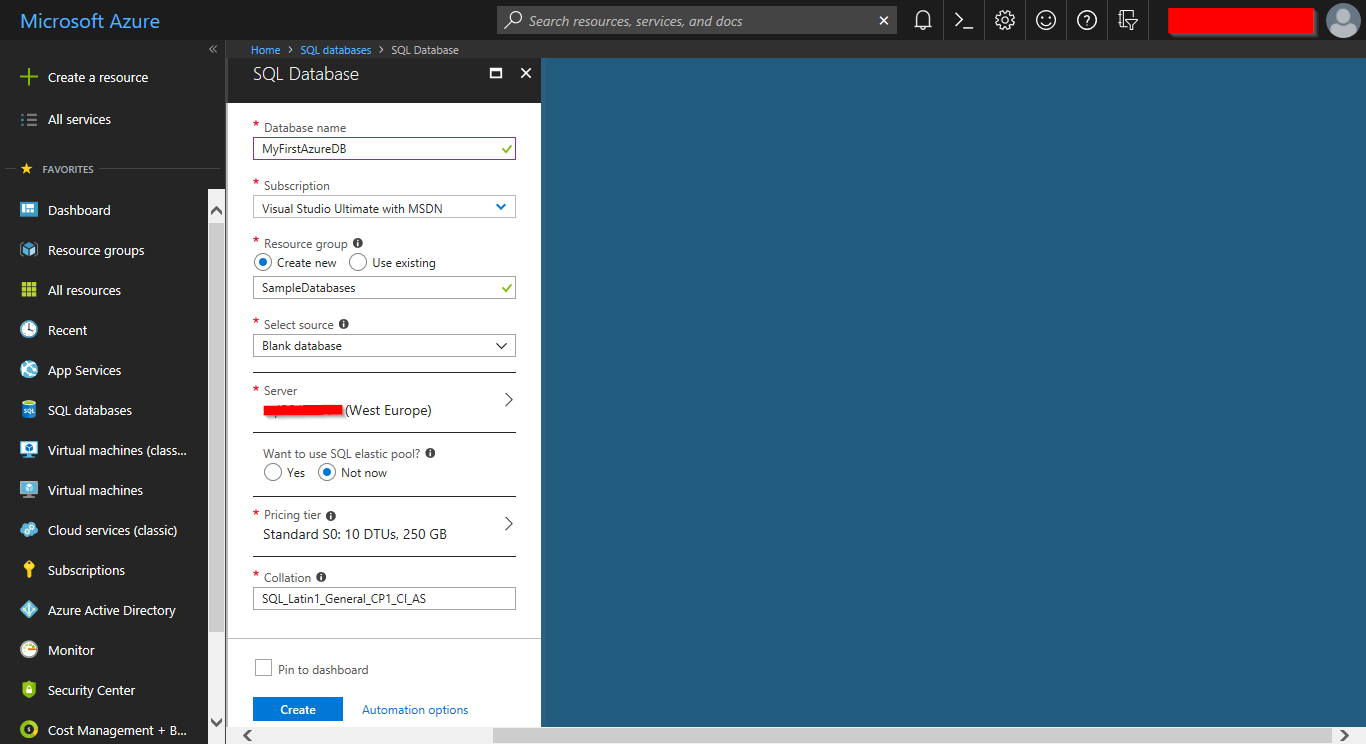
Step 3: We click on the the button “create sql database” and we fill in the required information.
While we entered the required information for our new sql database, we see that there is something more needed, and that is the “Server”. Therefore, since this is our first contact with Azure SQL Database, we also need to create a SQL Server instance. No worries, as it is very easy to do it. It is actually like ordering pizza 🙂
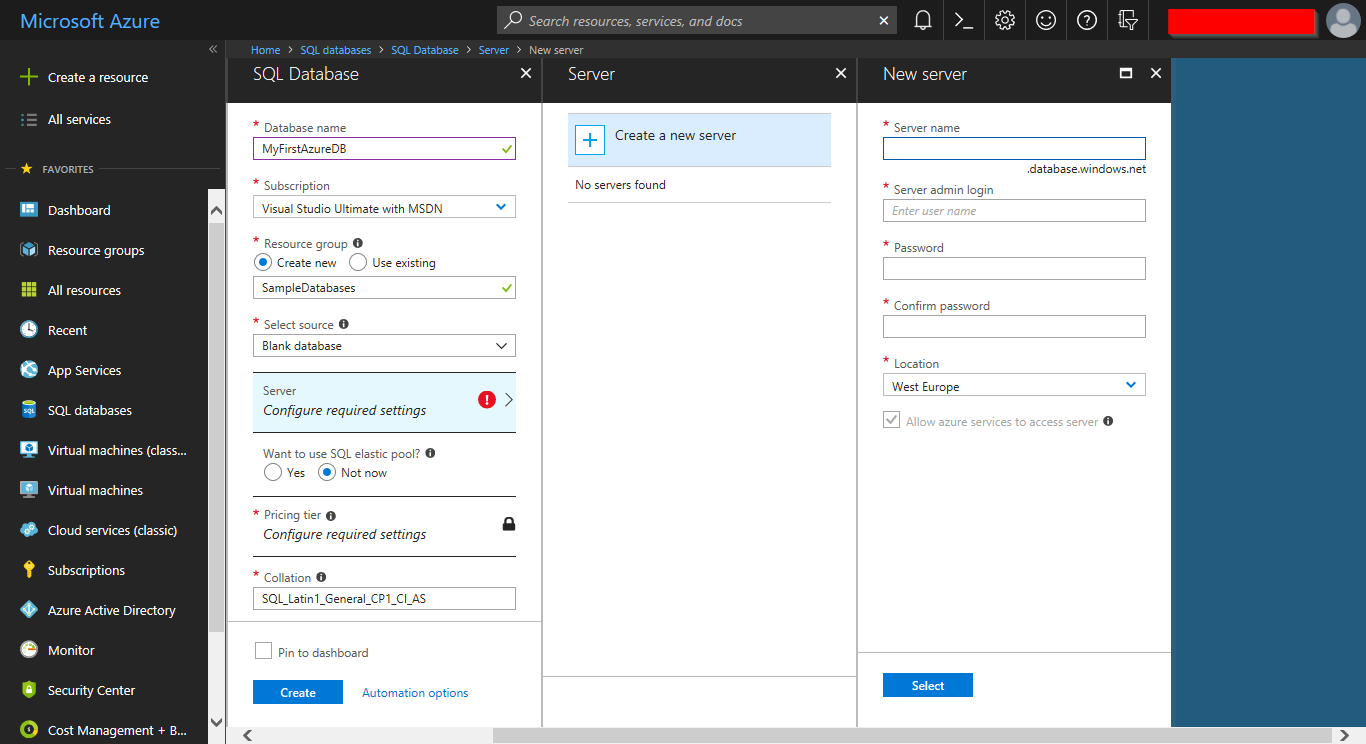
Step 4: Click on “configure required settings” under the “Server” section of the new SQL Database.
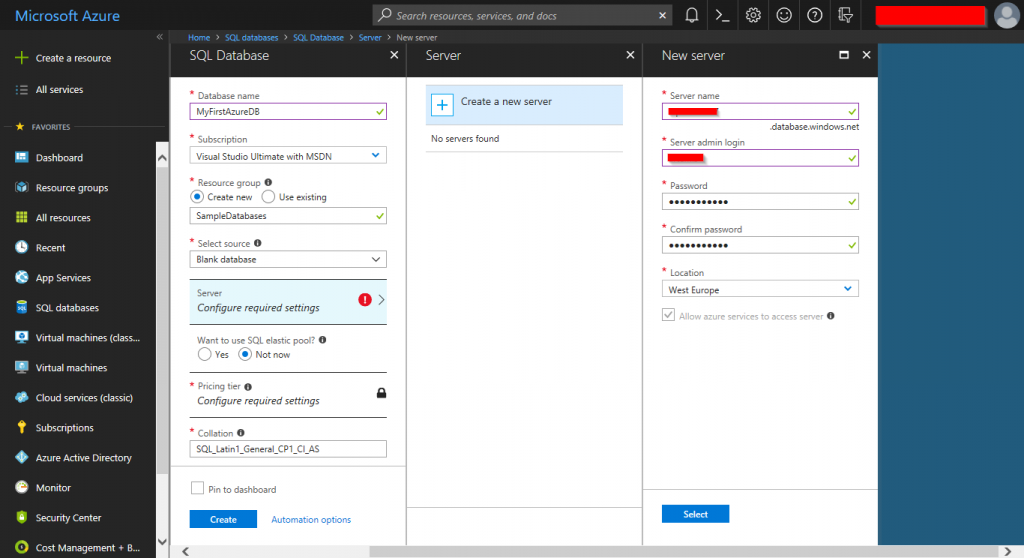
Step 5: We enter the details of the new SQL Server along with specifying an admin login. We click on “Select” and we proceed to Step 6.
Step 6: Now that the server has also been created, we click on “Create” (and if you want on the “Pin to dashboard” checkbox) and our first SQL Database starts getting created.
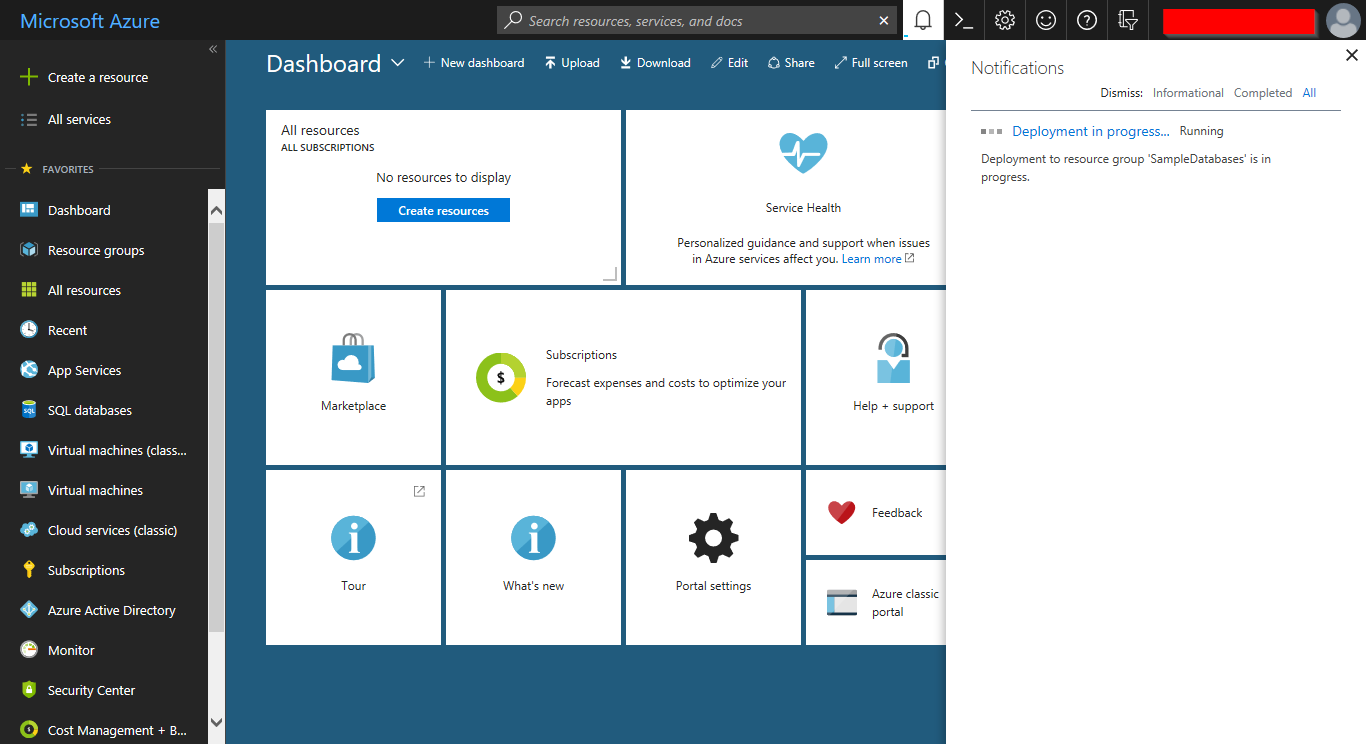
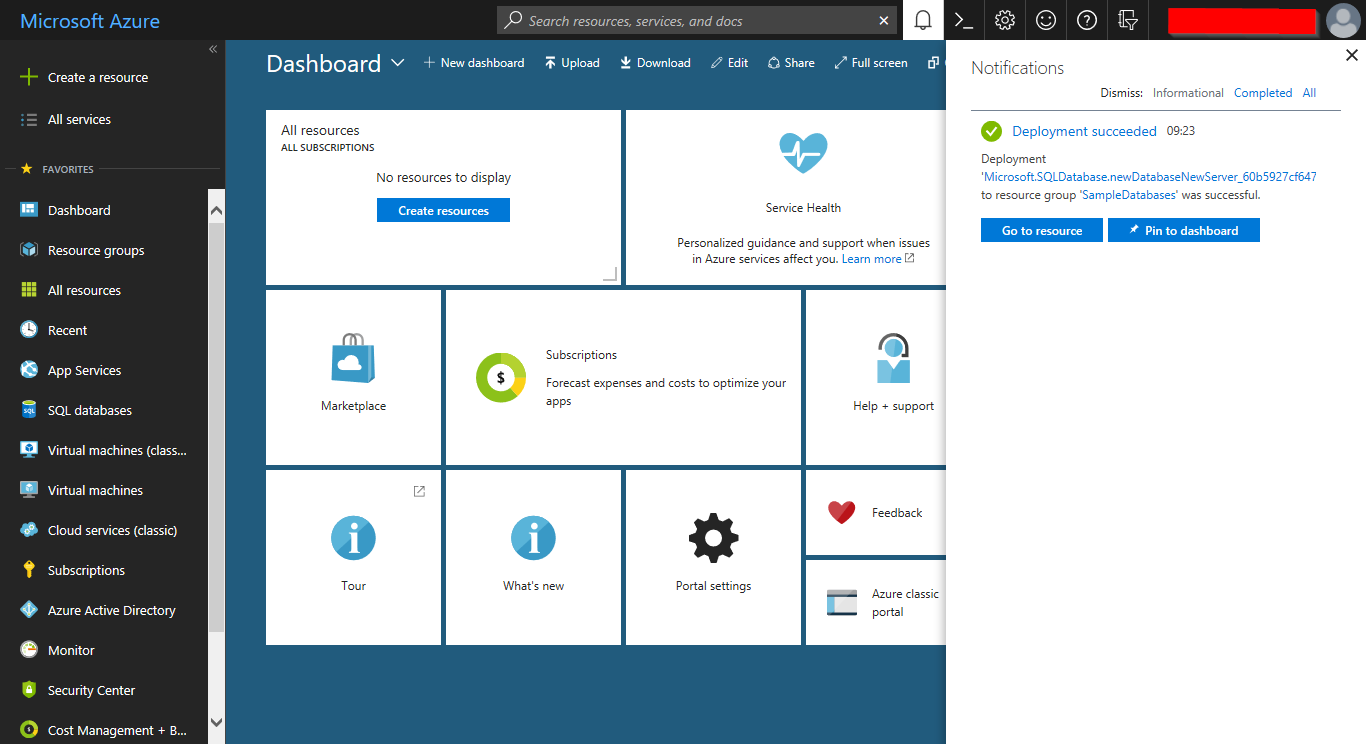
Step 7: As a confirmation step, we can check the notifications on our Azure Portal’s page.
We to see that deployment is in progress and eventually that deployment succeeded.
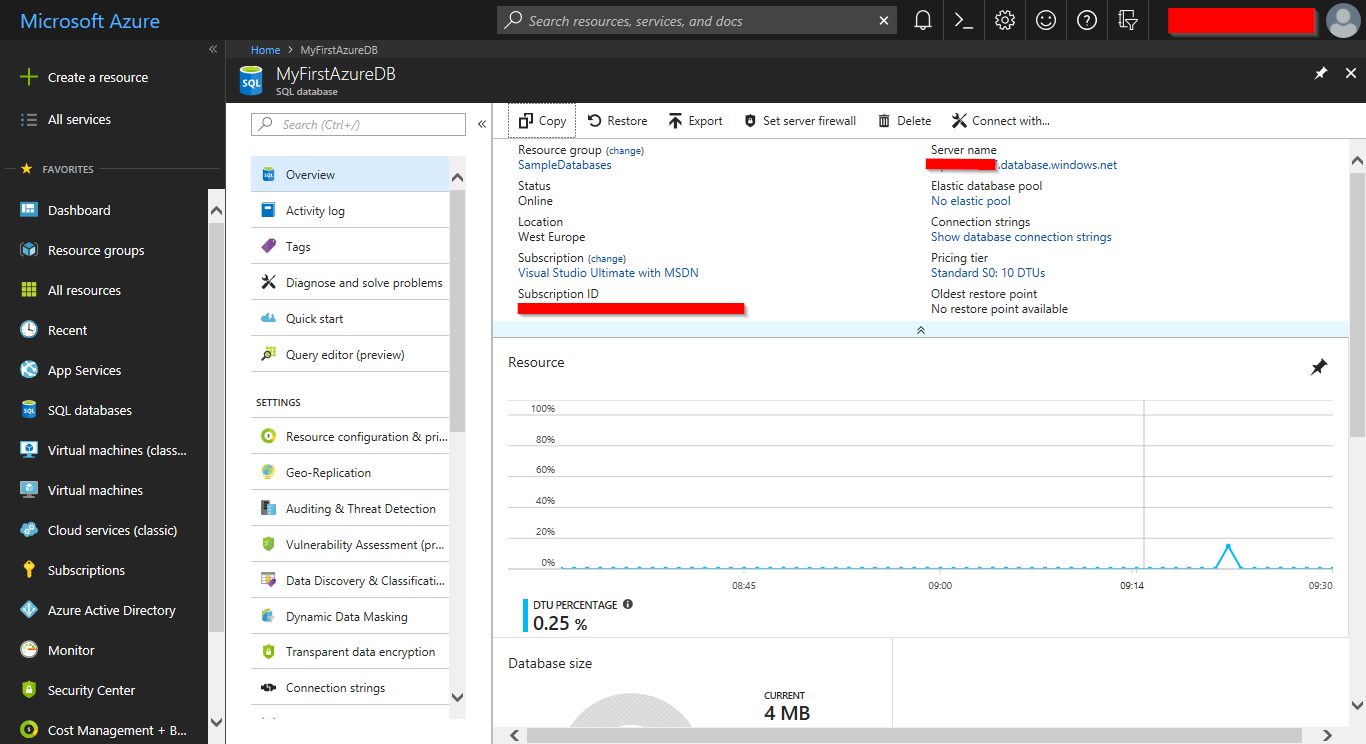
Step 8: We navigate again to the “SQL databases” section on the Azure Portal. We see that now our first database on the cloud has been successfully created.
We also see that we are now provided with a large number of available actions. On this page, we take a note of the “Server name” which we will later use from SSMS in order to connect to our database from on-premises.
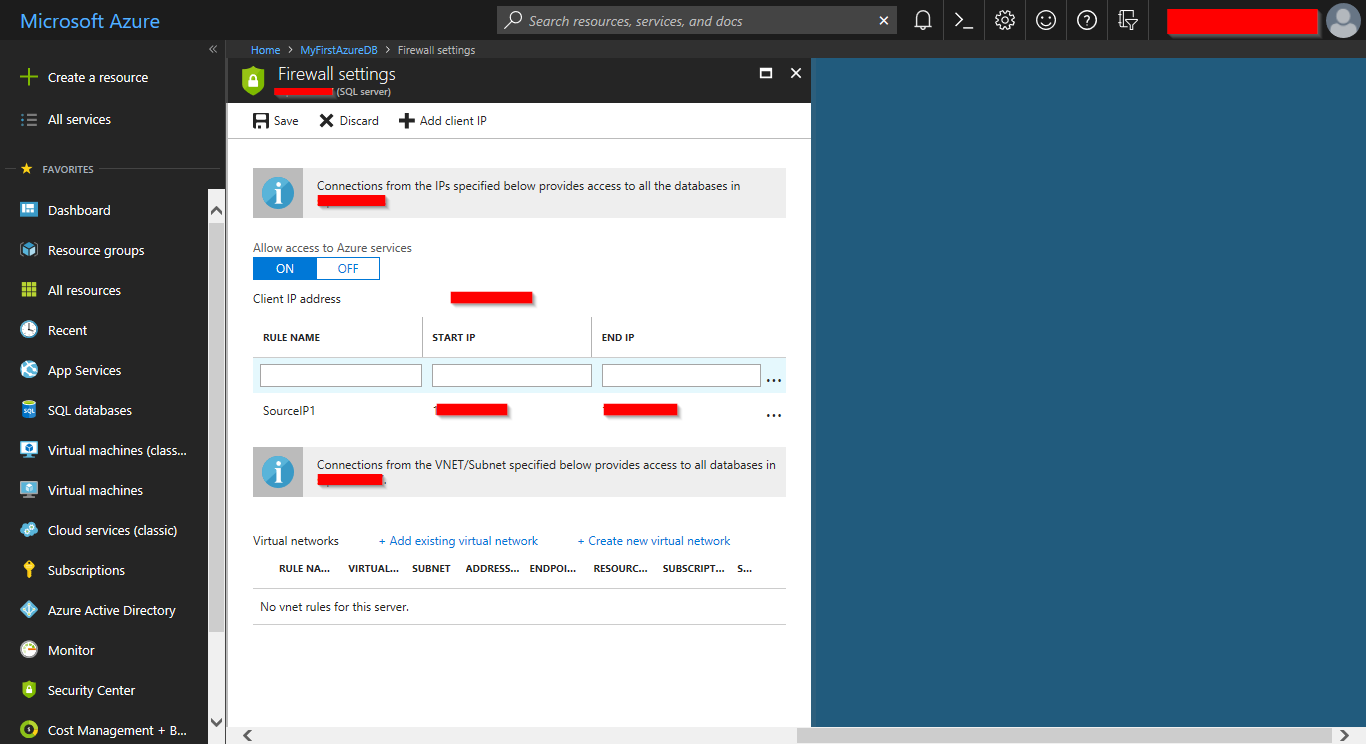
There is one last step we need to complete in order for our newly created Azure SQL Database to be accessible from our on-premises development tools such SSMS or Visual Studio. So, we proceed to Step 9.
Step 9: Set the firewall settings. For this example I’m allowing access just for the IP of my client.
This step is very important because besides the fact that you allow access to your client(s) IPs, you prohibit access to any other IP.
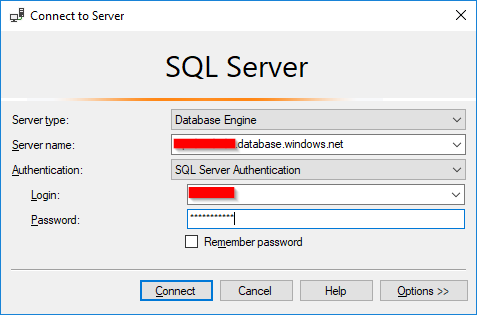
OK cool! Now let’s connect to our Azure SQL database using our favorite tool, that is SQL Server Management Studio (SSMS)! In this example, I’m using SSMS v17.6 which you can freely download from Microsoft.
Accessing your Azure SQL Database from on-premises using SQL Server Management Studio
So on the “Connect to Server” dialog which comes up right after we launch SSMS, we just enter the “Server name” noted on Step 8, we choose “SQL Server Authentication” and we enter the admin login and password (or if another login was created the credentials of that login) in order to access the database.
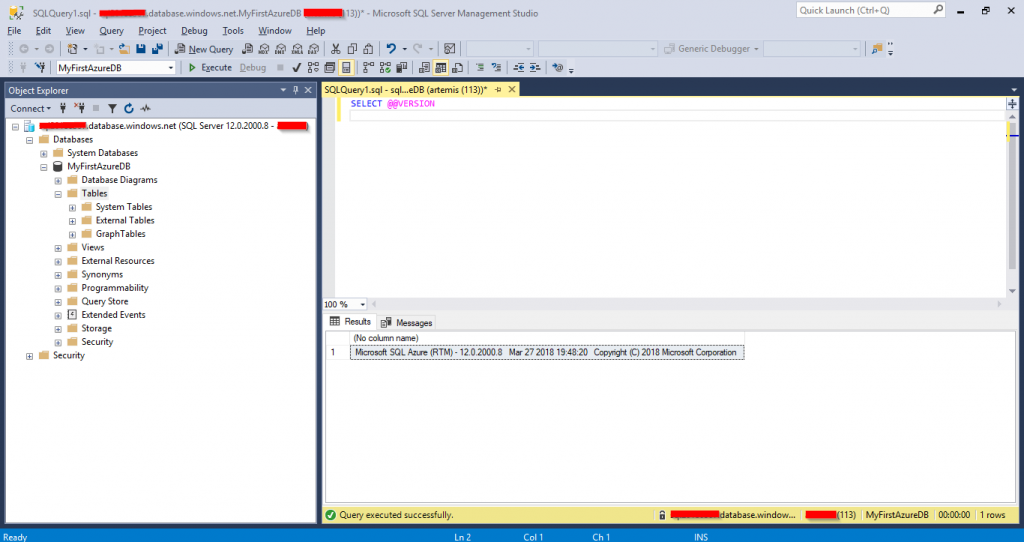
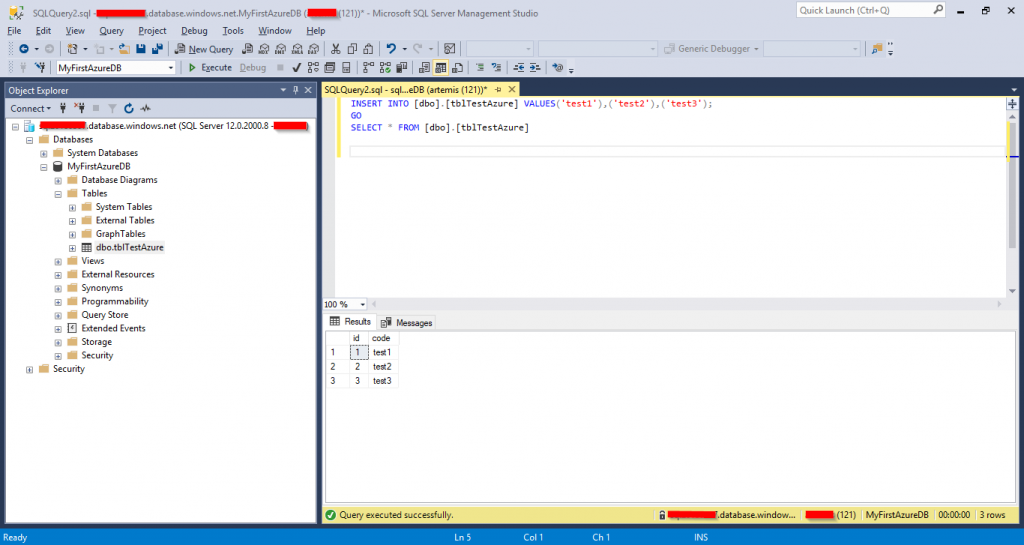
As you see, I managed to connect to my Azure SQL database via my on-premises SSMS and I work the same way I used to work before.
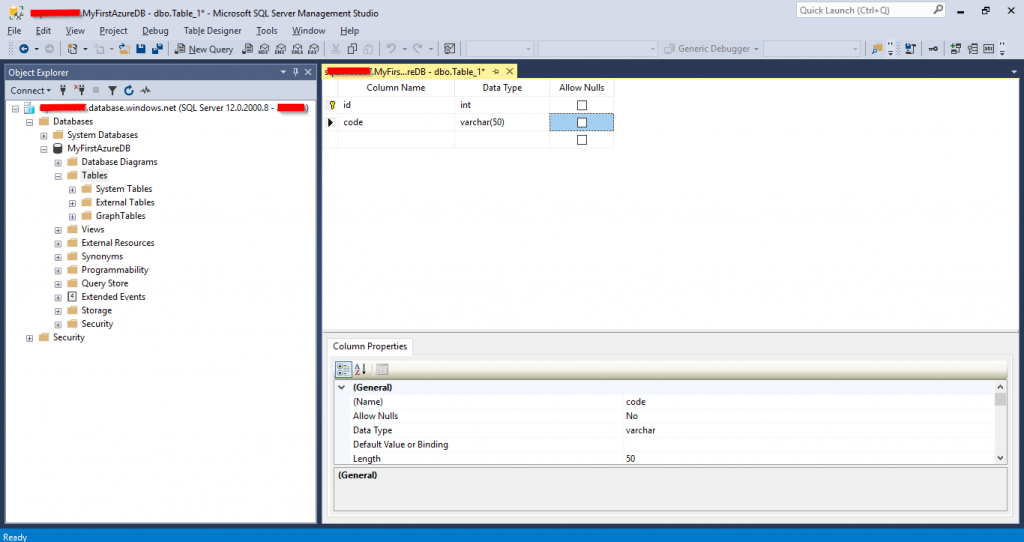
In this example I’m creating a table.
In this example I’m inserting sample data in the table and running a SELECT query.
Conclusion
In this article, we saw step-by-step, how easy is to create your first Azure SQL Database and access it from your favorite on-premises tools like SQL Server Management Studio. There are so many things to see. Azure SQL Database is full of features and based on the philosophy behind Cloud Computing, it is quite easy to configure and use all these features.
In subsequent articles on this series, we are going to see how to perform different tasks on our Azure SQL Database such as: encryption, auditing, tuning, replication, dynamic data masking and much more. Subscribe to our newsletter to stay up to day with all our articles, software tools, eBooks and more.
Learn More About Azure SQL Database!
Learn more about Azure SQL Database and get started fast and easy! Through our online course, you will get lifetime access to a comprehensive set of lectures and live demonstrations that will get you started with Azure SQL Database in no time! The course is regularly updated with additional educational material!
(Lifetime Access, Certificate of Completion and more!)
Artemakis Artemiou is a seasoned Senior Database and AI/Automation Architect with over 20 years of expertise in the IT industry. As a Certified Database, Cloud, and AI professional, he has been recognized as a thought leader, earning the prestigious Microsoft Data Platform MVP title for nine consecutive years (2009-2018). Driven by a passion for simplifying complex topics, Artemakis shares his expertise through articles, online courses, and speaking engagements. He empowers professionals around the globe to excel in Databases, Cloud, AI, Automation, and Software Development. Committed to innovation and education, Artemakis strives to make technology accessible and impactful for everyone.
Views:5,728
We use cookies on our website to give you the most relevant experience by remembering your preferences and repeat visits. By clicking “Accept All”, you consent to the use of ALL the cookies. However, you may visit "Cookie Settings" to provide a controlled consent. Read More
This website uses cookies to improve your experience while you navigate through the website. Out of these, the cookies that are categorized as necessary are stored on your browser as they are essential for the working of basic functionalities of the website. We also use third-party cookies that help us analyze and understand how you use this website. These cookies will be stored in your browser only with your consent. You also have the option to opt-out of these cookies. But opting out of some of these cookies may affect your browsing experience.
Necessary cookies are absolutely essential for the website to function properly. These cookies ensure basic functionalities and security features of the website, anonymously.
Cookie
Duration
Description
cookielawinfo-checkbox-analytics
11 months
This cookie is set by GDPR Cookie Consent plugin. The cookie is used to store the user consent for the cookies in the category "Analytics".
cookielawinfo-checkbox-functional
11 months
The cookie is set by GDPR cookie consent to record the user consent for the cookies in the category "Functional".
cookielawinfo-checkbox-necessary
11 months
This cookie is set by GDPR Cookie Consent plugin. The cookies is used to store the user consent for the cookies in the category "Necessary".
cookielawinfo-checkbox-others
11 months
This cookie is set by GDPR Cookie Consent plugin. The cookie is used to store the user consent for the cookies in the category "Other.
cookielawinfo-checkbox-performance
11 months
This cookie is set by GDPR Cookie Consent plugin. The cookie is used to store the user consent for the cookies in the category "Performance".
viewed_cookie_policy
11 months
The cookie is set by the GDPR Cookie Consent plugin and is used to store whether or not user has consented to the use of cookies. It does not store any personal data.
Functional cookies help to perform certain functionalities like sharing the content of the website on social media platforms, collect feedbacks, and other third-party features.
Performance cookies are used to understand and analyze the key performance indexes of the website which helps in delivering a better user experience for the visitors.
Analytical cookies are used to understand how visitors interact with the website. These cookies help provide information on metrics the number of visitors, bounce rate, traffic source, etc.
Advertisement cookies are used to provide visitors with relevant ads and marketing campaigns. These cookies track visitors across websites and collect information to provide customized ads.


")
